What is a startup folder in Windows 10?
The startup folder is a unique feature that was first introduced in Windows 95. Since then, it has been a part of all the operating systems which are launched by windows. The folder is a feature that allows the user to create a shortcut. This means you can add or remove Programs from the startup folder.
The shortcut starts running automatically every time the system boots up. This creates convenience for the user as he does not have to find the program again and again. The folder can include specific programs that the user wants to run sequentially once the system starts.
The startup folder of the windows contains mainly links to the major programs which the user wants to start running immediately after logging into the system.
In addition to this, the folder also contains some permanent files which are a part of the system and run during the booting process.
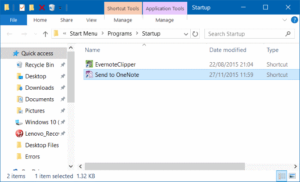
Here is what the window looks like:

The major benefit of using a startup folder is to save time on repeated operations.
By adding programs that are frequently accessed, the user can enhance the functionality of the system. For instance, if you are the user and extensively use skype, you can add it to the startup folder.
In this way, every time you boot your system, skype will automatically start running.
If the user is also the administrator of the system, he can decide for the shared startup folder at the same time. Once the shared startup folder is customized, everyone who uses the system from the guest account shall be able to access the same programs or files.
1. Finding the startup folder in Windows 10
In the earlier versions of the windows, the startup folder was directly accessible in the start menu. However, as Microsoft decided to shift the orientation of its users from commands based interface to graphic base interface, the location of the folder shifted.
It can be found in the windows 10 partition, where they are located deep in the directory structures.
You can access the startup folder in windows 10 with the help of shell commands. The shell commands are a part of the program which takes commands as inputs from the keyboard and sends them directs the operating system to perform a specific function based on the command.
It was a part of the Unix-like system in the initial period of computers and has been overruled by GUIs (graphic user interface) and CLIs (command line interface).
The startup folder can be located by any of the following three methods,
Method 1:
- Press the Start button on the taskbar.
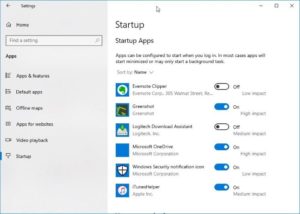
- Select Settings à Apps à
- From here, you can manage the apps that need to be turned on or off in the folder.
Method 2:
- If the Startup folder is not visible in Settings, right-click on the Start button in the taskbar and select the Task Manager option.
- From there, select the Startup tab or click on more details to access the folder.
- Once you find the folder, select the apps you want to include or exclude and click Enable and Disable button accordingly.
Method 3:
To find the location of the startup folder, you can also follow the shortcut-
- Open the run dialog box directly from the Start menu. The keyboard shortcut (Windows) will open the dialog box for you.
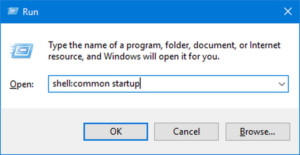
- Next, in the dialog box, type the command [shell: startup] if you want to open the startup folder for yourself.

- If you want to open the startup folder for all the users commonly, you must type the command [shell: common startup]

If you want to access the location of an individual user, the startup folder can also be accessed in the following location-
C:\users\%username%\AppData\Roaming\Microsoft\Windows\Start Menu\Programs\Startup
It must be noted that the %username% is the user account in which you have logged into.
2. Adding programs to the startup folder in Windows 10
Adding an application to the startup folder is quite easy. Certain applications allow you the option to run at startup in the settings itself.
If you want to add a similar app, you can save yourself from the extra effort. To check, go to the app and see if it provides you the option for the same.
However, if the app does not give you the option, you must follow these steps:
- Find the app by selecting the Start button.
- Next, you must extract the location of the file. Right-click on the app and select More to click on Open file location.

- Upon clicking, you will be directed to the location of the file shortcut.
- Once you have the file location, open the startup folder with the help of the shortcut mentioned above in the article.
- Simply copy the app shortcut and paste it to the startup folder from the file location.

3. Removing an app from the startup folder on Windows 10
Removing a program or an app from the startup folder can be done only if the user has the administrator privileges. This can be done by any of the following methods-
Method 1
The settings app in windows 10 allows you to manage programs that run automatically.
- Go to SettingsàAppsàStartup
- Manage the apps which you do not want to run automatically by turning them off.

Method 2
The startup folder saves the shortcuts of apps and programs which start while windows 10 system boots up. By removing the shortcut from the folder, you can permanently disable the app from running automatically.
Follow the instructions mentioned below-
- Access the startup folder with the windows shortcut and shell command.
- Once the folder opens, you shall be able to see the apps that are enabled in the folder. Select the app you want to remove and press the delete button.

4. Managing the startup folder in Windows 10
Certain core services are automatically enabled as the system boots up. These services ensure the smooth functioning of the system and cannot be managed by the user.
However, it is the installed user software that needs to be managed on the system by the administrator.
When it comes to choosing what programs to include in the startup folder, you must always take care of the following categories-
- Any security software like antivirus programs and firewalls must be enabled and included in the startup folder.
- Backup software helps you to protect the data on the system and hence, must be turned on in the startup folder.
- In addition to this, the user can also include important software which is used regularly on the system like clipboard managers, dropbox, email clients, etc.
- Also, Download Gameloop For PC & Bluestacks for Windows 7.
The user must make a note to not include any heavy software which slows down the boot-up process. Any gaming software, adobe apps, or cleaners must not be included in the startup folder.
In addition to this, you must also take care of the fact that including too many apps might slow down the functioning of the system.
Hence, the choice of apps must be made based on their size and relevance.
