Microsoft has always been lousy while handling elements of its operating system. The launch of Windows 10 came as a breath of fresh air. The tech giant introduced better support for malware and included a couple of new features to its operating system.
Amidst all the added features, some of the traditional features have been retained by Windows. These contribute to enhancing the experience of using the OS. Service host SuperFetch is one such feature that was initially introduced in Windows Vista.
The Service host SuperFetch feature analyses the RAM usage of the system and on the basis of that generates programs and software which are used more frequently. This makes it easy to access these programs on a regular basis.
The following article shall guide you on this vintage feature of the Microsoft operating systems. This can be used to optimize the memory of your computer. The article shall also cover ways to fix the feature or troubleshoot basic errors and bugs. Read on to find out more.
A handy memory manager
Service host SuperFetch can be understood as an efficient memory manager. It can be used to track the trends and analyze patterns to optimize memory. The process makes use of the basic tracking algorithm. It helps to create a cache profile of frequently accessed programs and applications. The feature keeps a close watch on the programs being used on the system.
When you leave an app or software, SuperFetch coordinates with the memory manager. This makes sure that the program can be loaded quickly in the near future. This is done by adjusting the cache memory of applications to optimize the time taken to open a frequently used app.
How to spot the SuperFetch process?
Before you make any changes to the process, it is necessary to be sure about the effect that SuperFetch has on your system. Spouting the process is a bit difficult because it is not easily visible in the task manager. This is primarily because SuperFetch is not listed as an individual process in Windows 10 and can be found under the general name of ‘Service Host.’
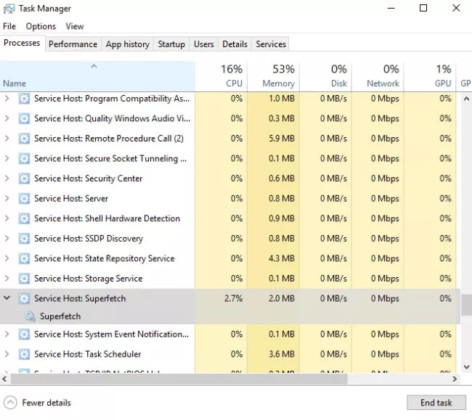
In order to locate the process, find the service named “Service Host: SuperFetch” from a long list of options.
ServiceHost SuperFetch 100% disk usage – Fix
Although Service host SuperFetch might seem to be a necessary process in Windows, it can mess with the functioning of the system. The process can take a toll on your disk usage as it occupies a high percentage of the total available disk usage.
Moreover, a major issue arises with the Service host SuperFetch process. It itself takes up a significant part of the available RAM of your system. This slows down other processes.
If you are a gamer, the process might nag you to the point that you are forced to disable it. Most players have complained that it brings down the frame rates. Others have admitted that the process has caused unwanted spikes in memory to the point of freezing the system.
The decision to keep or remove
No doubt, the process optimizes the speed and functioning of apps and programs on your system, but at the same time, it can also bring down your system. If you are to disable the process, you can be assured that the disabling process shall not lead to any further consequence. Since it is merely a memory management process, disabling it will not lead to any significant errors.
However, you must brace yourself for issues like longer booting time, slow response, minute bugs, etc.
Disabling the SuperFetch in Windows 10
When it comes to disabling the SuperFetch on your system, there are several ways of completing the process.
Using Command Prompt
- Type and search the “Cmd” in Windows Search box
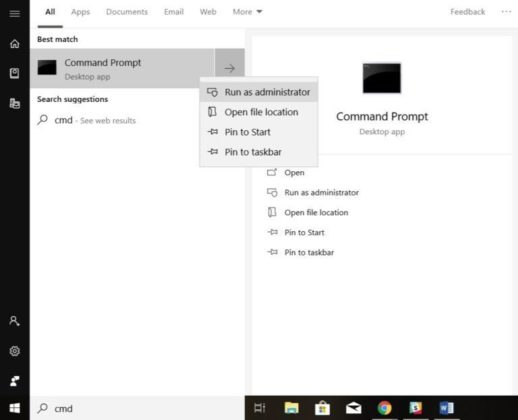
- Right-click on the option to select “Run as administrator”.
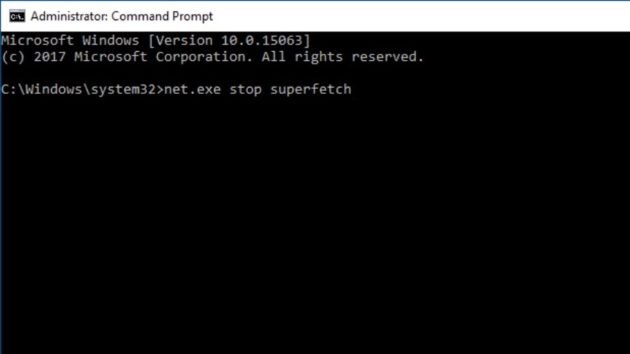
- When you are on the Cmd, type the command
- Net.exe stop SuperFetch and press enter.
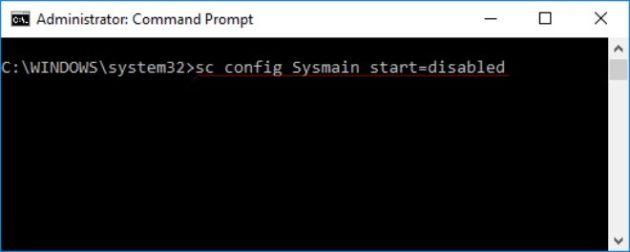
- Next, type “sc config sysmain start=disabled” and click Enter.
Using Services Snap-in
You can also use the services menu in the Windows box to disable the SuperFetch process on your system. In order to do this, follow these steps-
- Look for ‘Services’ option in the Windows Search and click on it.
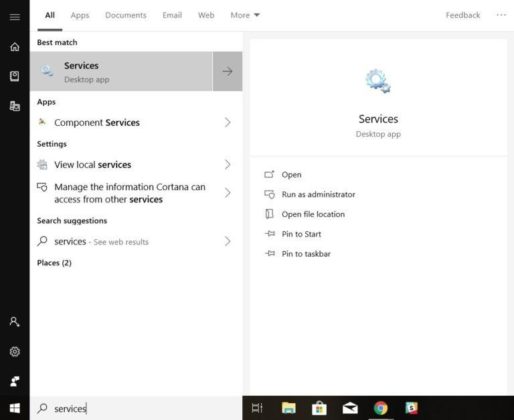
- Next, search services called ‘SuperFetch’ and double click on it to proceed.
- You will be directed to a small window where on the SuperFetch properties, click ‘Disabled’ under the drop-down menu of Startup type.
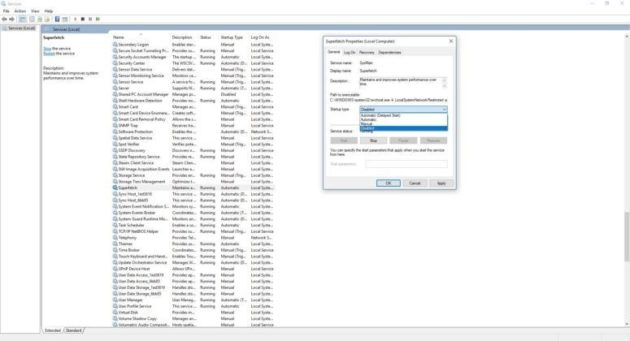
- Lastly, click Stop and reboot your system to implement the changes.
Troubleshooting the issue
The user can also run the troubleshooter in order to sort out the anomaly with the disk performance. Follow these instructions for the same-
- Go to the control panel by pressing the Windows logo key on the keyboard.
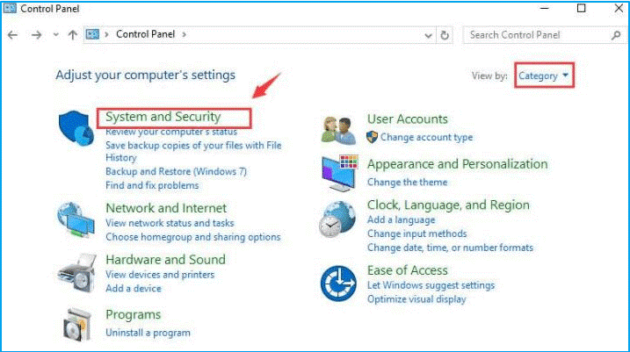
- Click on the control panel and, from there, navigate to System and Security.
- Next, click on security and maintenance and go to the troubleshooting.
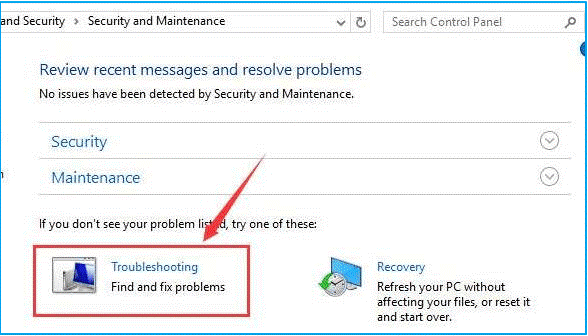
- Select the ‘fix problems with windows update’ option and click next.

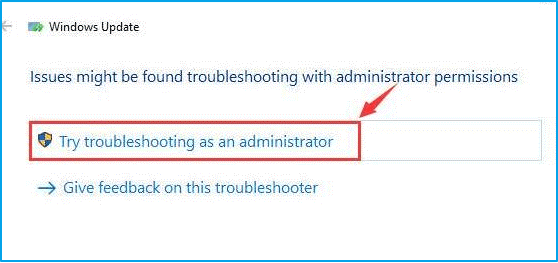
- Click ‘try troubleshooting as an administrator,’ and you shall have trouble-shot the issue correctly.
Fix ServiceHost SuperFetch High CPU usage
Another downside of using the Service host SuperFetch process is seen in the form of high CPU usage. Users often complain that the process hogs up as much as 95% of the CPU and approx. 72 MB/s of the system’s ability to read and write.
In order to counter the issue, the best suggestion would be to disable the process along with other memory management services as well. The following are solutions for disabling the process-
Fixing the memory leak
In order to resolve the Service host SuperFetch issues, you can also try fixing the memory leak in the non-paged pool of memory. The process to do so is as follows-
- Click the Windows key to open the Run function in Windows.
- Type Regedit in the window and click on Enter
- On the left side of Registry Editor, navigate your way to the following directory-HIKEY_LOCAL_MACHINE> SYSTEM>mControlSet001
- Next, click on the Services in the left pane and scroll down on the drop-down box. Choose the option ‘Ndu.’
- On the right-hand side, find the registry value titled Start and double click on it to modify it.
- Change the current Value date to 4 as this will disable and plug the memory leak in the non-paged pool.
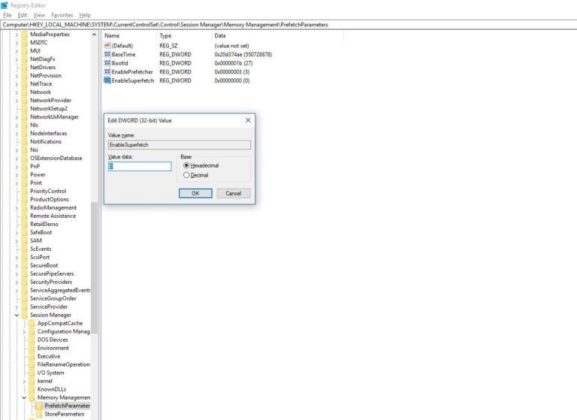
- Finally, click on Ok and close the Registry Editor.
- Restart your system, and once it reboots, you will notice that the local system is not using a significant amount of space on CPU.
Using Task Manager
Using the task manager to kill the service host is another approach to tackling the issue of Service host SuperFetch using up the CPU space. Follow these steps to do the same-
- Press Ctrl+ Shift+ Del keys together to open the task manager on Windows. Alternatively, right-clicking on the taskbar shall also launch the task manager.
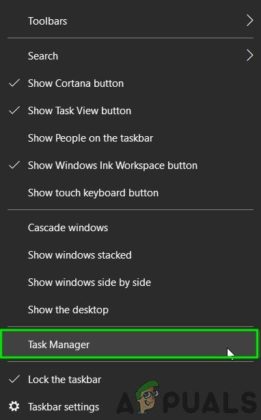
- Click on more details to find all the running processes in the manager
- Find the “service host: local system,” which is responsible for hosting the Windows updates. Select the option and then click the ‘End task.’
- Once the confirmation shows up, click on the ‘Abandon unsaved data and shut down’ option and once that is done, shut down your system.
- In order to check if the issue has been resolved, monitor the CPU load.
- Speed up Windows 10 PC
- Best Android Emulators For Mac
Seek professional help
If you are still not able to tackle the issue on your system, it would be best advised to find technical help so you can get the desired support. There are quite a few firms that offer technical assistance for troubleshooting software bugs. Hiring professional advice will ensure that the issue is well researched and permanently taken care of.