Virtualization is one of the emerging concepts in the software industry which is gaining popularity. It refers to the practice of running more than one operating system on a single machine.
Since windows create a partition within its operating system, it is termed as a ‘virtual’ machine. This runs inside the original operating system.
A virtual machine allows you to run applications and software dedicated to a particular OS on your system without any hassles.
If you are planning to install virtualization software on your system, here is a comprehensive guide. It talks about the various alternatives available for a windows user.
Read on to find out in greater detail about the process.
System requirements to run Hyper-V
Before you begin with the installation of the virtual machine, it is essential to check if your system will run the newly installed Hyper-V or not. In order to check this, follow the following steps.
- The system you choose for installation must be running on the business edition of Windows 10. It can be either Pro or Enterprise because Windows 10 home shall not support Hyper-V.
- Next, you must also check if the CPU and related hardware meet the requirements. If you have a recently purchased system, you might not even have to worry about it. This is because their CPUs are already equipped with the required features.
- You must also check the processor since Hyper-V requires at least 64-bit Windows to run. If you are still using the 32-bit processor, you will not be able to run the virtual machine.
- The capacity of RAM is also quite important in the installation of the product. A minimum of 4 GB of RAM is recommended to run Hyper-V. Are you are planning to run multiple apps, programs, and software through the virtual machine? Then you must go for a higher RAM capacity in order to prevent your system from slowing down.
Steps to Enable Virtualization on Windows 10
Hyper-V
Hyper-V is the name given to the hardware virtualization product of Microsoft. The products allow you to create and run a virtual machine.
A virtual machine, essentially, is the software version of the system. It acts as an individual system, enabling you to run different programs.
Since the product is capable of running in its exclusive isolated space, it means that you can run multiple virtual machines on the same system.
Hyper-V is available for Windows and Windows Server. For the former, it is available as a feature in the 64-bit version.
For the latter, it is available in the form of a server role for x64 versions of the Windows Server. In addition to this, you can also download it as it is available as a standalone and downloadable server product.
Installing Hyper-V on Windows 10
If you are installing the Hyper-V on your system, follow these steps to avoid any error or bug in the process-
- Check for some basic pre-requisites while installing Hyper-V. This includes checking for the operating system, processor, RAM, and BIOS.
- The next step is to set up the Hyper-V. Go to the BIOS settings and ensure that the hardware virtualization support is turned on.
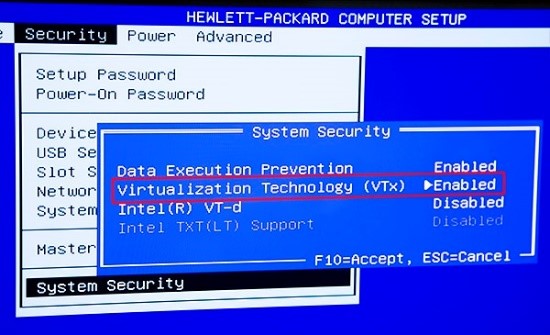
- Save the new BIOS settings made and boot the system normally.
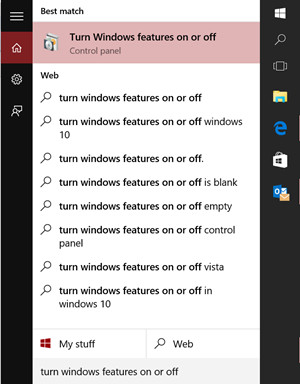
- Next, go to the taskbar and type ‘turn windows features on or off’ in the search option. Select the feature.
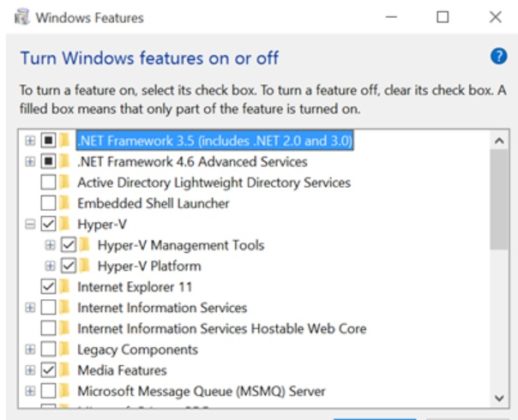
- It will display multiple folders. Select Hyper-V and enable it from there itself.
- If the Hyper-V was not enabled in the previous settings, you will have to reboot the machine to implement the changes.
- Now, go to the taskbar and click on the search icon to type the Hyper-V manager and select the option.
- On the Actions panel in the Hyper-V, click on the Virtual Switch Manager and select the option
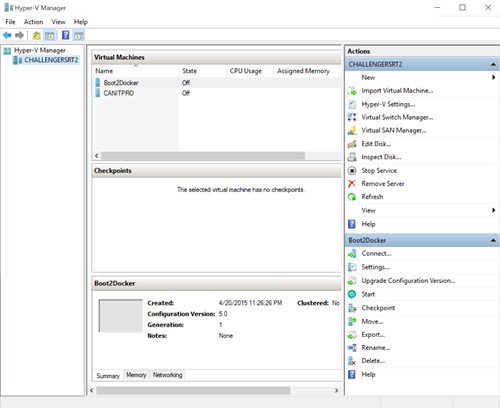
- Create a Virtual Switch by clicking on the same button after ensuring that External is highlighted.
- Lastly, in order to make sure that the VM external network connections work smoothly, select the right NIC.
An alternative method of Hyper V installation
Follow these steps to run the virtual machine on your system-
- Press the Windows+R key and in the space provided type: Optionalfeatures.exe and press Enter
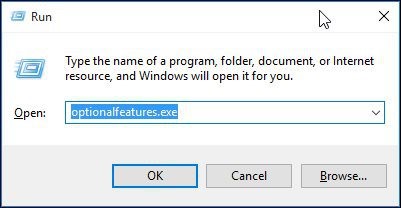
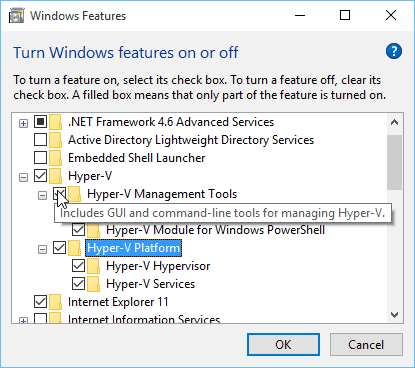
- Pressing the key will show you to the ‘turn Windows on or off’ option from where you can select all the options relating to Hyper-V and press OK.
- You will be directed to a small dialog box. Here, Windows is installing and configuring the Hyper-V. Once this is done, you will be asked to restart the system to confirm the changes.
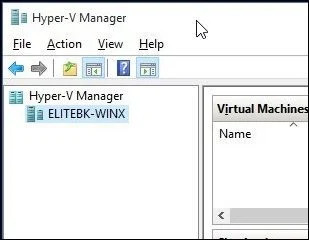
- Launching the Hyper-V Manager to create a virtual machine
- Open the hidden quick access menu by pressing on the Windows+X key.
- From there, go to the Control Panel>Administrative Tools>Hyper-V Manager
- On the left side, select the name of the machine. Once done, the Actions pane will be enabled on the right-hand side.
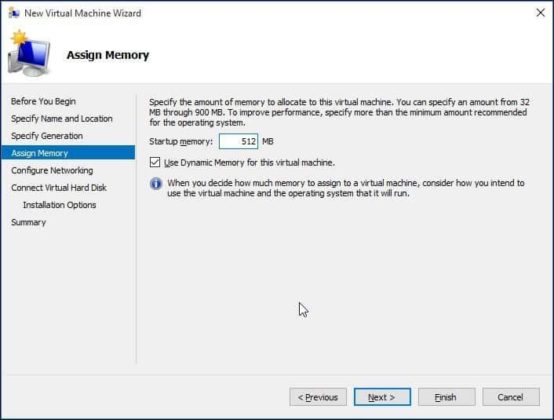
- Under the same option, click New>Virtual Machine. This will set the Create a new virtual machine wizard and simply follow the instructions that appear.
- You must select and specify the location for storing the virtual machine. Select the generation type you would prefer. Dedicate a specific memory to the virtual machine and configure the network settings (optional).
- Review your options once you have finished with the process and when satisfied, click on Finish.
With this, you will have installed the virtual machine on your system. Choose to install any other operating system or run any software on your system.
Install Hyper-V on Windows 10 using Command Prompt [PowerShell]
One method of installing Hyper-V is with the help of virtual machines but there are other alternatives to automate the process. Among these, the use of PowerShell is quite popular.
PowerShell is a framework by Microsoft which is designed for task automation.
It is basically a command-line scripting language. It is used for performing specific tasks in operating systems like Windows, Linux, and macOS. Follow these steps to install virtualization using PowerShell-
- Go to the Windows start button and type PowerShell.
- Next, type and run the following command to find a list of commands available for the Hyper-V PowerShell module:
Get-Command -Module hyper-v | Out-GridView
- On successfully typing the command, you will see a dialog box. It reflects all the commands available for Hyper-V installation. You can learn about any command, in particular, using the following command:
Get-Help Get-VM
However, in order to create a virtual machine using PowerShell, here are the steps-
- First, you need to open the PowerShell command which contains elevated privileges.
- Type and run the following command to create a new virtual machine:
New-VM -Name Testmachine -path C:\vm-machine --MemoryStartupBytes 512MB
- Next, type and execute the following instructions to create a new hard disk virtually:
New-VHD -Path c:\vm-Machine\Testmahcine\Testmachine.vhdx -SizeBytes 10GB –Dynamic
- For the next step, you need to execute the following command to attach the hard disk with the virtual machine:
Add-VMHardDiskDrive -VMName TestMachine -path "C:\vm-machine\Testmachine\Testmachine.vhdx"
- Next, you need to map an ISO image to the virtual machine which will be used in the installation process. For that, type the following command:
Set-VMDvdDrive -VMName -ControllerNumber 1 -Path
- Once this is done, you can start the virtual machine with the following:
Start-VM -Name
With this, your system will have finished with the virtualization process.
That’s all about Windows 10 Virtualization guys. I hope, my article helped. Feel free to share the article and give your feedback in the comments section.
